
Playing the tournament was therefore a rather risky business because not passing the examination would have implied an additional term until graduation. In spite of the limited preparation time, I have just walked away with a mark of 1.7 (i.e. B+ in Anglo-Saxon vicinities), which is an absolutely fantastic result. Now I'm sitting in the cafeteria, having a bottle of Victory beer, as is custom amongst students after examinations. Then I'll continue writing my next to last thesis, which should be finished within a month, followed by my final thesis and graduation by late autumn.
So this explains the first part of the title, but what about the Shadow? Well, after having led the league by one point until the 9th and last round last Sunday, my team lost the deciding match against the last remaining contenders SC Heusenstamm, who thus overtook us right before the finishing line.
It was a very close match in which Heusenstamm, who were actually the favourites, had the better start, with several of my team mates having been pressed into defensive positions. After it became clear that some games were promising for our opponents, I got offered a draw in the following position:
Uwira, O. (2240) - Solonar, S. (2338)
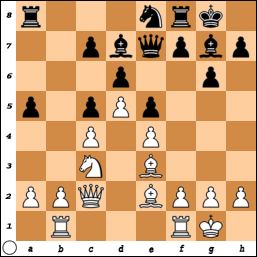
The position is actually quite promising for White because it's easy to break up the barricades on the queenside. However, a plan must be found with regard to the defensive setup on the kingside, as Black is of course planning to initiate the typical King's Indian attack. Basically, White has three options once the Black f-pawn reaches f5:
- Simply answer f2-f3 and allow f5-f4: this counts on being faster on the queenside and actually seems to be the most promising option. The point is that in the usual queenside attack White only has c7 at his disposal for invading with his heavy pieces. Here there White will most likely have b7 and c7.
- Take on f5 and play f2-f3: White will restrain the Black pawn center and effectively forces Black to sacrifice a pawn by e5-e4 at some point. White will still play on the queenside and the will not be slow.
- Take on f5 and play f2-f4: this restrains the Bd7 and marks the f5 pawn as either a target for direct attack or as an anchor for the lever g2-g4 once some pieces have been exchanged. However, this doesn't really work here, because Black's pawn on c5 covers the d4-square, which is normally used as a hub by White's pieces once Black has committed e5-e4 in this structure.
So you see, now, after I have analysed a bit, I sort of know what is going on, but during the game I was busy with determining the chances of my team mates, trying to decide whether to accept the draw offer or not. Thus I spend ten minutes watching the other positions, sat down for 10 minutes thinking about the position, got up again to have a final look at the other boards, and then sat down again.
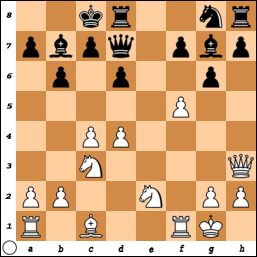
I wanted to accept the draw, but that seemed to be ill-advised, given that some positions at the other boards really looked very dangerous for us. So I played on, knowing that the chance to draw would not return, and moreover, I also followed the worst of the three above-mentioned plans...
15.a3 f5 16.exf5!? I now believe that it is best to just play 16.f3. 16...gxf5 17.f4? As explained, this is only playable if White will have d4 at his disposal once Black has played e5-e4. 17...Nf6 18.Rbe1(?) e4! Well, now the rook at e1 looks silly but I already had to defend against stuff like Ng4 or Ne4.
I'll omit the rest of the game here because it was both brutal and straightforward. With a tougher defense I might have saved the game, but as my time was running out I lost the big picture and got knocked out along the g-file. In the end we lost the close struggle with 3.5-4.5 and came in as runner-ups, which wins us the crap medal.
Thus I lost that game because of a gross strategical misjudgement, which is a pity because I could have actually known what to do if I had had some time to prepare. But here we're back to Light - at least I've passed my exam. I'll probably be playing chess all my life but I certainly don't want to stay at the university for much longer.
 Now it's time to reach a decision. Some of my fellow players claimed that White would have had a huge advantage after 13.d5 but my oppenent had planned 13...Be5 against that and it's not self-evident where the White advantage actually lies. I believe that White probably should move his queen, thus breaking the pin of the pawn f5. An idea would be e.g. 13.Qd3 Nf6 14.Bg5. What I did instead was preparing an ambitious exchange sacrifice, planning to lock the black pieces behind their pawns. 13. Bg5?! f6 14. Be3 Ne7 White could still apply the emergency brake with 15. Ng3 here. But my idea was tempting me too much. 15. d5?! The exclamation mark is only given for the vim to actually push through with the plan. 15...Nxf5 16. Rxf5 In for a penny, in for a pound! 16...gxf5 17. Nf4 Rde8 18. Nb5 Re5! (Diagram)
 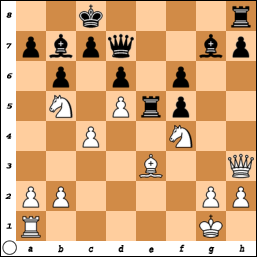 Black had sunk into deep thought for half an hour and now presents the refutation of White's sacrifice. Passive moves would have led to the setup that I had envisaged, a.k.a plant a knight into e6, take back the pawn on f5, massage the rest of the pawn weaknesses. The fact that he didn't look too happy while searching for 18...Re5! told me that he probably didn't think that my sacrifice was complete nonsense and that he was well aware of the looming dangers. With the strong text move, Black brings one of his rooks into battle before the door is closed on e6. Moreover, the rook also supports the bind-breaking c7-c6. 19. Nxa7+ Kb8 20. Nb5 Rhe8 21. Bd2 c6 22. Nd4 cxd5 23. cxd5 Bxd5 Too bad, that 24. Nxd5 Rxd5 25. Qb3 is saved by 25...Qb7. Now White can only play on for tricks. 24. Bc3 Bf8 25. a4 Be4 26. Nb5 d5 27. b4 d4 28. Nxd4 Bxb4 29. Nb5 Bxc3 30. Qxc3 Rc8 31. Qb4 Rec5 32. Nd4 Qd6 33. Qd2 Rc2 34. Qe3 R8c3 35. Nb5 Rxe3 36. Nxd6 Rec3 37. g4 Rf3 38. Rf1 Rxf1+ 39. Kxf1 fxg4 40. Nh5 Bd3+ 0-1

